How to Upload a File to Arcgis Onine to Make Choropleth Map Using Shape Length and Shape Width
Prerequisite
Familiarity with Microsoft Ability BI.
In this tutorial, you lot volition utilize the Mapbox Visual in Microsoft Ability BI, data with data about US wildfires past state, and a custom tileset with information well-nigh Us wildfires by county to create a choropleth visualization. This choropleth volition display the number of acres burned at both the state and county levels, assuasive you lot to drill into the data at the appropriate level. Yous will need a Mapbox account and a Microsoft Power BI account to complete this tutorial.
This guide walks through using the Mapbox Visual in Power BI Online. The procedure in Power BI Desktop is like, but the interface is dissimilar.

Getting started
Hither are a few resources you'll need before yous go started:
- Mapbox account. Y'all need a Mapbox account and a Mapbox access token, which you can discover on the Account folio.
- Microsoft Ability BI account. Sign into your Power BI business relationship or create a new ane.
- Mapbox Visual for Power BI. Yous can either add the Mapbox Visual using the Power BI Market place, or you can download the latest Mapbox Visual from the open-source GitHub repository. Both of these options are explained in item in the tutorial.
- Geospatial data. You volition upload this GeoJSON file, which contains county-level detail near wildfires in the U.s.a., to Mapbox Studio equally a tileset.
Download GeoJSON
- Dataset for Power BI. You will upload this sample dataset, a CSV file that contains historical information nigh wildfires in the Us, to Power BI.
Download CSV
Upload your tileset to Mapbox
Before you tin reference the geospatial information from the downloaded GeoJSON file in a Ability BI report, yous need to upload it to Mapbox as a tileset.
Note
To upload geospatial data to Mapbox as a tileset, the information must be in 1 of the following formats:
- MBTile
- KML
- GPX
- GeoJSON
- Shapefile (zipped)
- CSV
For data on upload file size limits for these formats, refer to the Uploads troubleshooting page.
- Navigate to the Tilesets page in Mapbox Studio.
- Click on the New tileset push button.
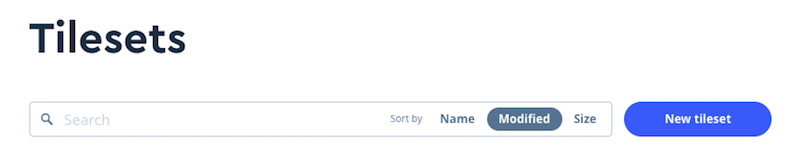
- In the New tileset window, you can either click the Select a file push button and choose the file, or you tin drag and drop the file directly into the window.
- When you are prompted to do so, click Confirm.

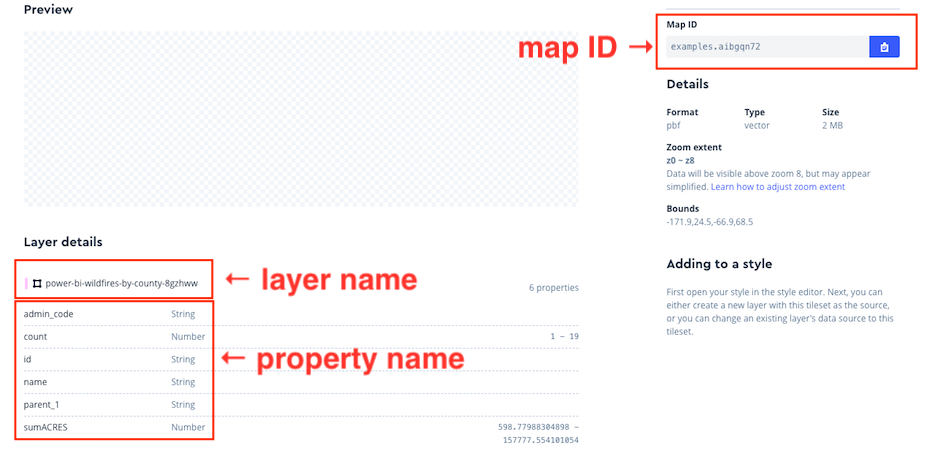
- After the file uploads, you will see a confirmation success message. Click on the link in the confirmation message to open the new tileset'southward Tileset explorer.
- In the Tileset explorer, click on Share & employ to notice the tileset ID, which you will need to reference in Power BI. The Tileset explorer also includes the layer'south proper name and the layer's properties, which y'all will need as well.
You will use these pieces of information in the Add together a custom tileset section of this tutorial. For now, though, you will open Power BI.
Add data to Power BI
You will start by calculation the wildfire data you downloaded to a new Power BI workspace.
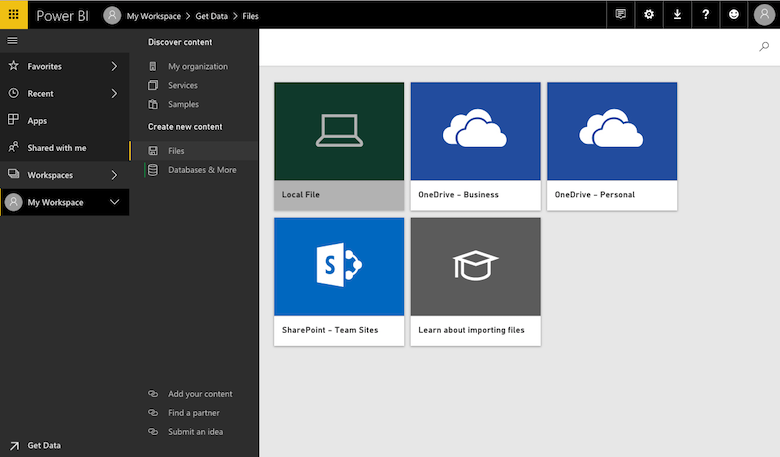
- In Ability BI, click Go Data, which allows you lot to import data or connect to a information source.
- Under the Files option, click Get.
- Choose Local File and upload the wildfire information CSV file.
Notes on using a custom dataset in Ability BI
Your dataset should be a CSV file with at to the lowest degree ii columns. One column must exist a unique identifier, which volition be used to friction match a unique belongings from your tileset. The 2d column must be the value you want to connect to the unique identifier. (For the dataset in this instance, the unique belongings is the state_name, which you volition match to the pre-defined Power BI state tileset. The value you connect to the unique identifier volition be the number of acres burned.)
Create a new report
- Click on My Workspace and select the Datasets tab.
- Click the Create a report option (the bar graph icon) next to the new dataset. This will open the report window.

Add the Mapbox Visual to the report
You can use the Mapbox Visual for Microsoft Power BI with any dataset that contains geographic data values. To add together the Mapbox Visual to your report:
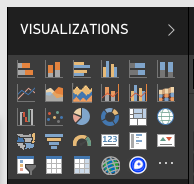
- In the Visualizations pane, click the Import a custom visual option, represented by a three-dot icon.
- Select Import from marketplace.

- Enter "Mapbox" in the search bill of fare and printing enter.
- Click the Add together button next to the Mapbox Visual option to add it to your Ability BI report. Afterward the Mapbox Visual is imported, it will appear as a blueish Mapbox logo on the Visualizations pane.
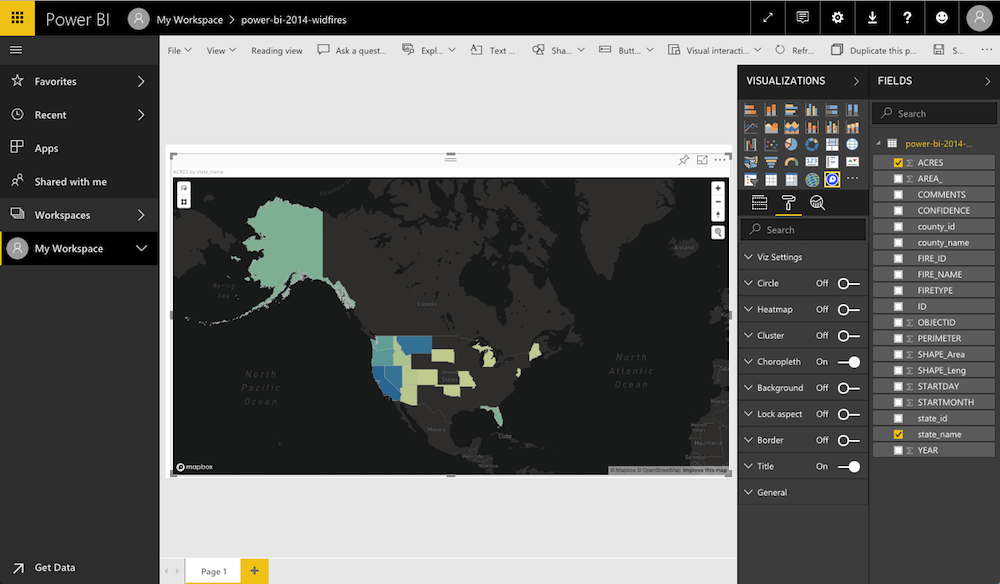
Build the choropleth visualization
Include an access token
- Click on the Mapbox icon in the Visualizations pane to add a new visualization to your study.
- In the Fields tab, elevate the
state_namefield from your data onto the Location shelf. You should encounter the Mapbox visualization container populate with instructions on how to create your first visualization.
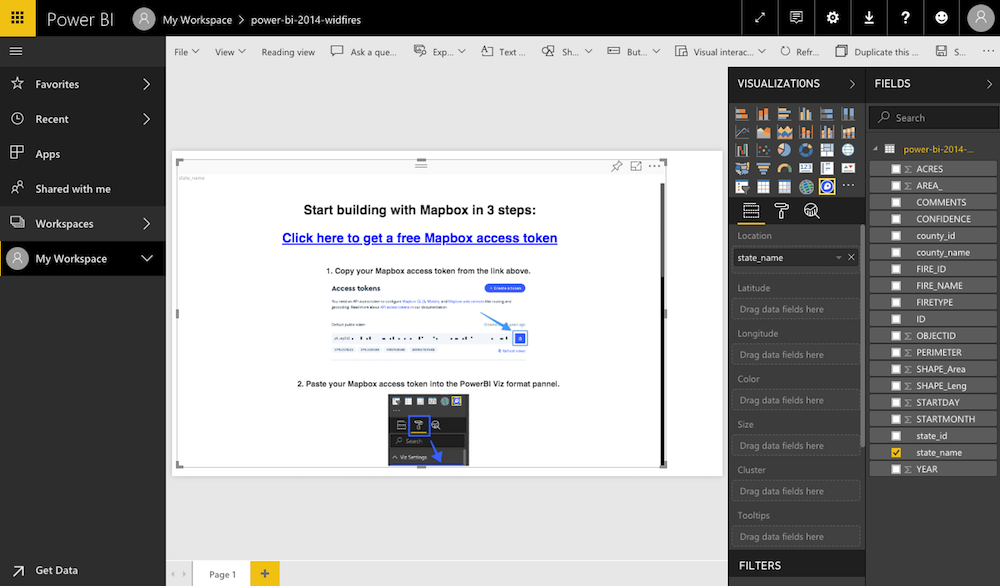
- Connect your Mapbox account using your admission token:
- Click the Click here to get a free Mapbox admission token link in the visualization container. Accept the external link asking if prompted. You lot will be forwarded to either the Mapbox sign up folio or your Mapbox account page.
- Copy your Mapbox Admission token from your account page.
- Dorsum in Power BI, become to the Format tab and open the Viz Settings option. Paste your access token in the Access token field.

Create the choropleth
- In the Viz Settings pane, modify the Map Style pick to Nighttime.
- Drag the
ACRESfield from the data options onto the Color shelf. - Go dorsum to the Format tab. Switch the Circumvolve option off and turn the Choropleth choice on.
You will see a choropleth that visualizes the number of acres burned per country.
Add a custom tileset
To drill down more than securely into data about wildfires in the U.s.a., you will reference the custom tileset with information most wildfires at the canton level that you created in the showtime step of this tutorial.
To add this information to Power BI, yous will plug its identifying features into the appropriate fields in Power BI. The data that you'll demand from the tileset are the tileset ID, the layer name, and the unique identifier property proper name.
- In the Format tab, click on Choropleth to open the choropleth layer settings.
- Use the Number of levels dropdown carte du jour to change the number of levels to ii. (Having two levels will allow you to drill downwardly from the state-level data in Level i into the county-level information that you are calculation now.)
- In the Level dropdown, select Level two.
- Click on the Data Level 2 dropdown.
- Select the Custom Tileset option.
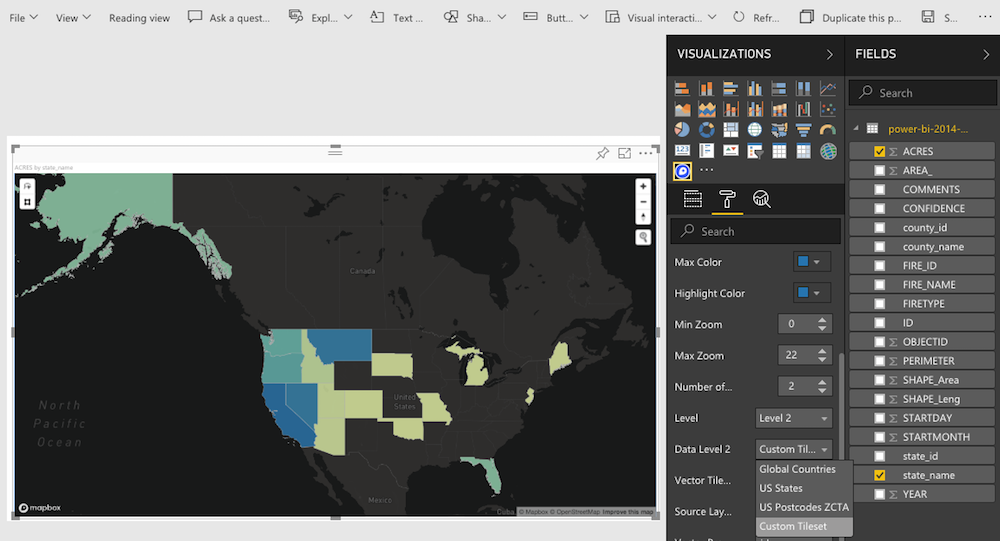
- In the Vector Tile URL Level 2 field, paste the tileset ID. The tileset ID in this field must e'er exist preceded by
mapbox://. - In the Source Layer Name Level 2 field, paste the layer's name.
- In the Vector Property Level 2 field, enter the unique identifier belongings proper noun:
id. - Click on the Fields tab once again. Drag the
county_idfield from the data options onto the Location shelf.
Using a custom tileset in Power BI
The boundaries in a custom tileset should contain one unique identifying property key that matches the dataset you lot are using in Ability BI. Common examples are: FIPS code, zip code, ISO code, or any unique name cord.
Final product
Utilize the buttons on the upper left side of the visualization to drill upwards to the state level or down to the canton level. Hover over a land or canton to see the number of acres burned in that specific boundary.
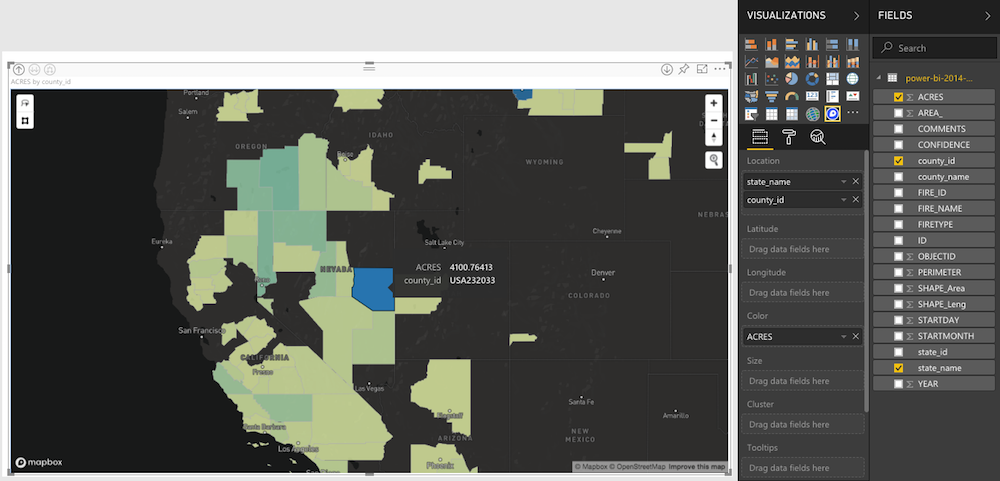
Yous have created a choropleth visualization in Microsoft Power BI using the Mapbox Visual for Power BI.
Side by side steps
- Explore ways to further customize the choropleth. For instance, yous could use the Choropleth settings in the Format tab to change the color range of the visualization.
- Follow the Create information visualizations guide for Power BI tutorial to learn how to fashion a circle layer in your Power BI visualization.
- Review the Integrate the Mapbox Visual for Power BI guide for configuration tips and troubleshooting recommendations.
For boosted support with the Mapbox Visual, you tin open an issue in the open source repository or contact our support team.
Want to practice more with Mapbox and Power BI? Contact Mapbox sales to learn what else is possible, from calculation custom shapes to visualize territories, adding detailed indoor maps, or visualizing billions of data points.
Source: https://docs.mapbox.com/help/tutorials/power-bi-choropleth-map/
0 Response to "How to Upload a File to Arcgis Onine to Make Choropleth Map Using Shape Length and Shape Width"
Post a Comment